Salesforce Winter ‘22 release is just around the corner. After having published the blog on general Salesforce updates, this time we have come up with an exclusive article on fabulous Flow features from this release. This release probably has, the largest number of Flow updates ever since Flow got an overhaul back in 2019. Salesforce is, certainly, “GOING WITH THE FLOW” to a declarative and point-and-click automation future with absolutely no updates in Process Builder and Workflow. There are almost 30 release updates with regards to Salesforce Flow and we have come up with our fabulous 15. The features are categorized in different sections namely Flow Builder, Flow Debugging and Flow Management. So, let’s have a quick rundown of the latest and greatest features of Salesforce Flow.
Flow Builder
1. Connect a Record-Triggered Flow to an External System Using an Asynchronous Path
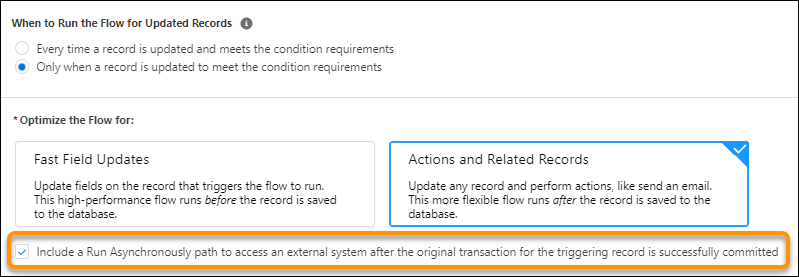
At last, now it is possible to integrate Record-Triggered Flow with an external system and update external objects using clicks not code. To do that, just include an asynchronous path that can run after Flow has finished with what it was meant to do. E.g. You can have a Record-Triggered Flow firing on Sample Request object when approved, then you can send those details using an asynchronous path to a third-party ERP for actual fulfilment of the samples and shipment.
Reference URL – https://help.salesforce.com/s/articleView?id=release-notes.rn_automate_flow_builder_asynchronous_path.htm&type=5&release=234
2. Roll Back Pending Record Changes When a Flow Element Fails at Run Time

There’s a shiny, brand-new element in Flow Builder called as “Rollback Records”. You can use it to reverse a transaction to roll back the records created or updated and prevent the Flow from making any further amendments during its course in a fault path. Earlier, even if Flow used to fail, the pending record changes used to get committed to the database which was not ideal. So now Roll-Back Records element gives you the granular control on how the Flow should behave if anything goes wrong along the way. E.g. If you have a Screen Flow where a user is required to create a Contact and a then Case to associate with it, should the Case creation fail, the Flow shall roll-back the transaction and does not commit the created Contact.
Reference URL – https://help.salesforce.com/s/articleView?id=release-notes.rn_automate_flow_builder_roll_back_records.htm&type=5&release=234
3. Supercharge Scheduled Paths with Enhancements for Minutes, Batching, and Limits
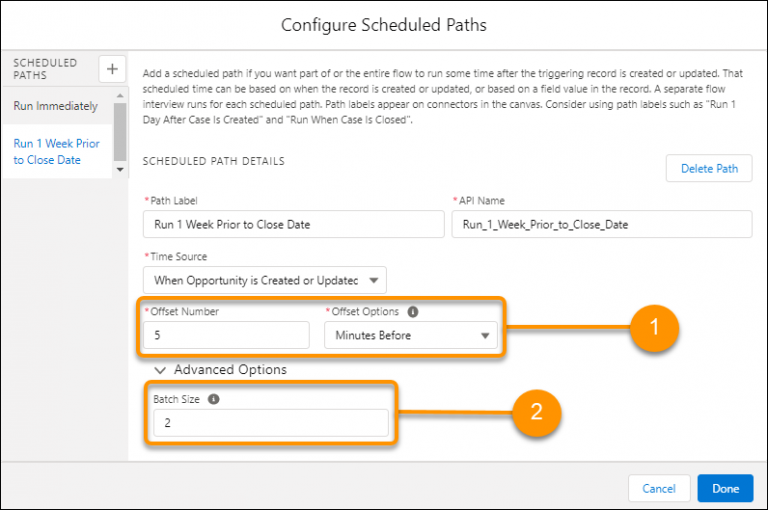
Now you can specify the time in minutes for when the scheduled path should run for a Flow. Before Winter ‘22 you could set the time only in hours or days before the time. Furthermore, you can also define the batch size to process limited number of records at a time. This will allow you to increase the performance of system and stay below the set governor limits for batch size. E.g. Now you can send event attendees reminders merely before a few minutes and process the attendee records in a pre-defined group of batches.
Reference URL – https://help.salesforce.com/s/articleView?id=release-notes.rn_automate_flow_builder_scheduled_paths_minutes.htm&type=5&release=23
4. Send an Outbound Message from Your Record-Triggered Flow
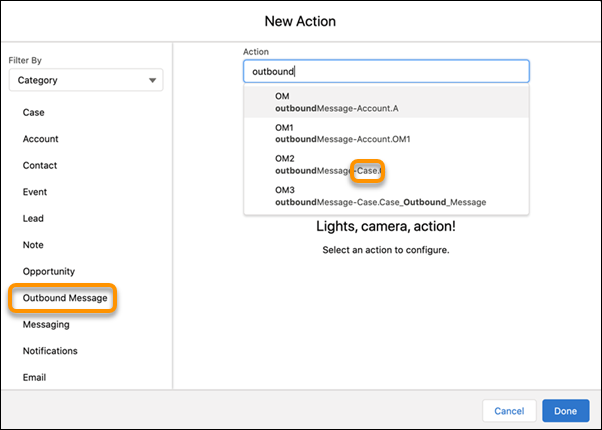
Big update alert! “Now you can send an Outbound message from a Record-Triggered Flow”. Yes, you heard it right! The “Outbound Message” is available as a core action in Flow Builder. This probably steals the show when it comes to the Flow updates in WI ‘22 release as this was the most awaited update required. Now is that a good-enough reason to migrate to Flows? Or do you still have some excuses to still keep using Workflows? e.g., Notify an external service endpoint when a high-priority Case is created, or an Opportunity is closed, etc.
Reference URL – https://help.salesforce.com/s/articleView?id=release-notes.rn_automate_flow_builder_outbound_message.htm&type=5&release=234
5. Enjoy a Streamlined Trigger Setup Experience in Flow Builder
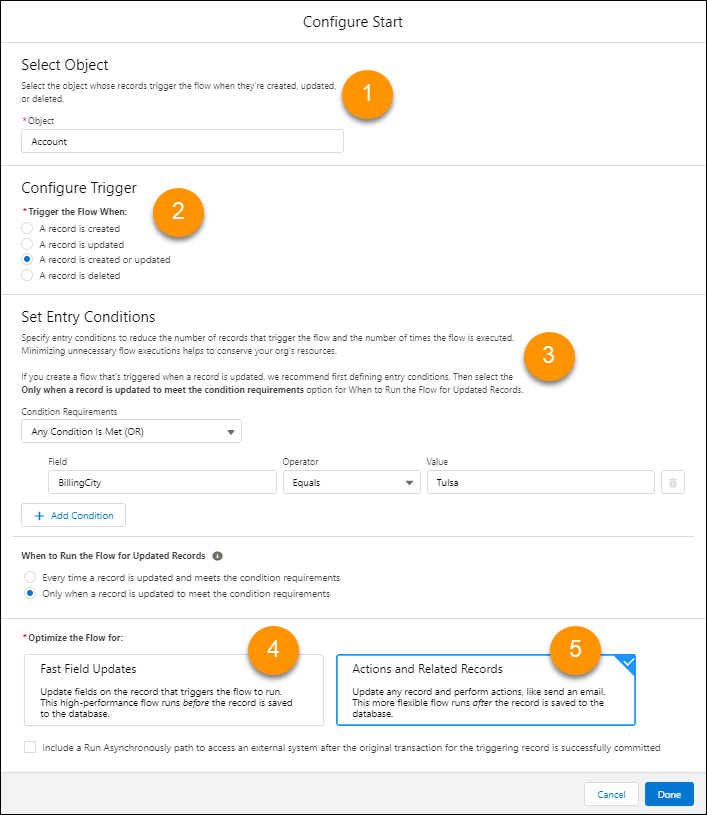
Salesforce has fulfilled the communities’ demands yet again. We now have a redesigned “Configure Start” page in Flow builder. Now you can set all the firing conditions for a Flow on a single page starting from selecting the object, configuring the trigger, setting entry criteria, and finally selecting how best to optimize the Flow. Surely, this is going to be a swift experience for admins or developers in configuring the Flows. Earlier you had to do this on different screens.
Reference URL – https://help.salesforce.com/s/articleView?id=release-notes.rn_automate_flow_builder_improved_trigger_setup.htm&type=5&release=234
6. Customize Button Labels in the Flow Screen Footer (Beta)
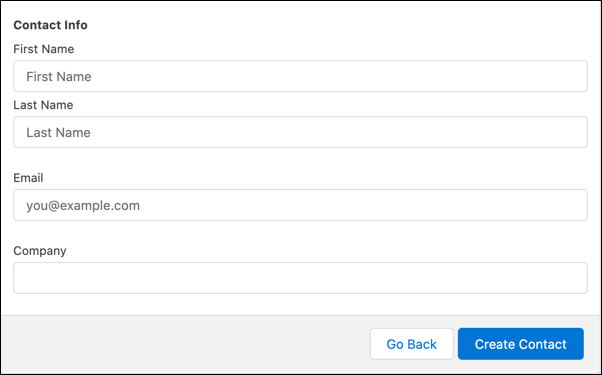
When you are creating a Screen Flow, now you can rename the footer navigation button labels for Previous, Pause, Next and Finish buttons to whatever you want; taking one more step towards customizing the user experience. It helps users understand what is going to happen if they click any of those navigation buttons. As depicted in above picture, ‘Create Contact’ button clearly signifies that a user needs to click that button to create a Contact record rather than just having generic Flow “Finish” button. Earlier developers had to create custom components only to customize the footer labels, but not anymore.
Reference URL – https://help.salesforce.com/s/articleView?id=release-notes.rn_automate_flow_builder_custom_footer_labels_beta.htm&type=5&release=234
7. Connect to More Elements Across the Auto-Layout Canvas (Beta)
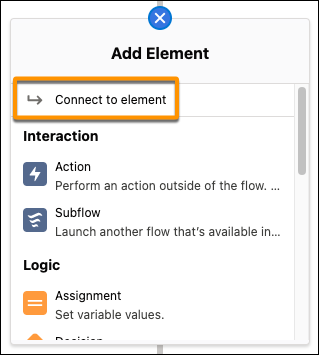
When you are creating a Flow in the Auto-Layout canvas mode, use the new “Go to Connector” to connect to a Flow element that do not follow the regular consecutive auto-layout path. You can use this feature to connect to any other element except an End element. This helps to connect any two elements that are not one after the other on the auto-layout path. Just click the Add Element node on the connector that you want to change, and then select “Connect to element”.
Reference URL – https://help.salesforce.com/s/articleView?id=release-notes.rn_automate_flow_builder_connect_more_in_auto_layout.htm&type=5&release=234
8. Set Up Flow Screen Choice Options with Fewer Clicks
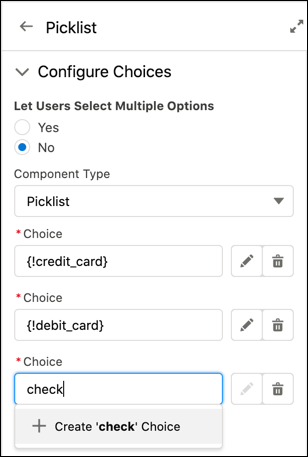
Fast-create Screen Flow choice option feature is yet another productivity booster and time-saving update for working with Screen Flows. Using which you can quickly create standalone choice options for your choice components, thereby reducing the number of clicks it used to take otherwise. It is facile to create a standalone choice, just fill the text in the Choice field, and click the option to create that choice. Flow Builder creates the standalone choice for you and adds a reference to it in the Choice field.
Reference URL – https://help.salesforce.com/s/articleView?id=release-notes.rn_automate_flow_builder_simpler_choices.htm&type=5&release=234
9. Create a Managed-Installed Flow That Admins Can Override and Customize
As an ISV Partner developer, now you can create Flows that can be overridden by admins to customize a portion of the installed package. A package can contain a plethora of components so by providing this ability to admins they can customize a certain part of the overall package to meet org-specific business requirements. Once admin creates an override, the new Flow is used when the criteria is met. This frees admins from updating any of the references such as processes, REST API calls, or custom buttons or links. E.g. An admin wants to change a Flow from a package which is embedded in a Lightning page. The admin saves the original Flow as an override and the changes are made to new Flow which is visible on the page later. Prior to this, the only option admins had was to create a Flow from a template.
Reference URL – https://help.salesforce.com/s/articleView?id=release-notes.rn_automate_flow_builder_overrides.htm&type=5&release=234
Flow Debugging
10. Change Record Field Values Temporarily While Debugging
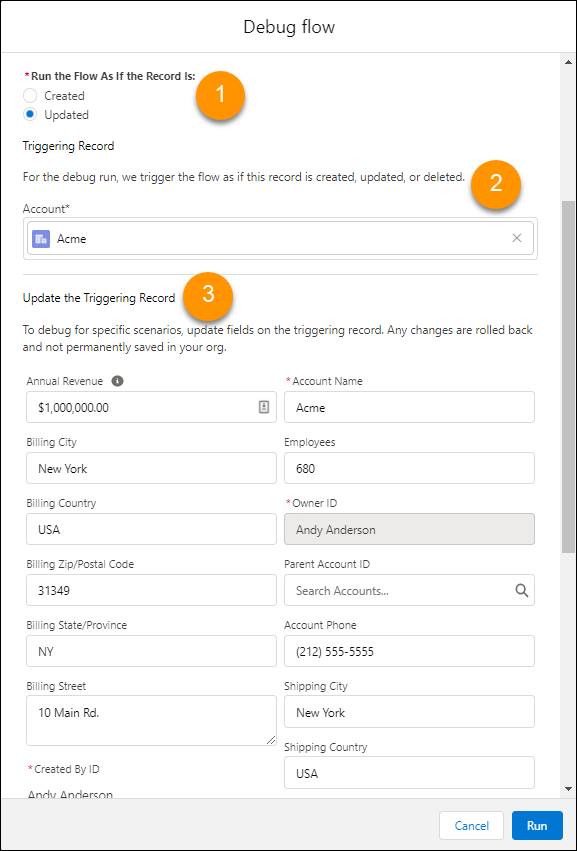
Now you can take the benefit of updating the values of a record while debugging your Flows. No more switching browser tabs to go back to record, make changes and come back to Flow builder in setup. That’s cool. Furthermore, you also have the ability to change the debug entry conditions and decision outcomes. Gone are the days when you could select only the record to debug your Flows. Important thing to note here is even when you are updating the records, they are rolled back after debugging is complete. So don’t panic about making any changes to database. E.g. You are testing if the billing address fields are changed during an Account update transaction, then you can perform those steps in the Debug Flow page similarly how you could have done on a record page.
Reference URL – https://help.salesforce.com/s/articleView?id=release-notes.rn_automate_flow_debug_inline_editing.htm&type=5&release=234
11. Debug Scheduled Paths in Record-Triggered Flows
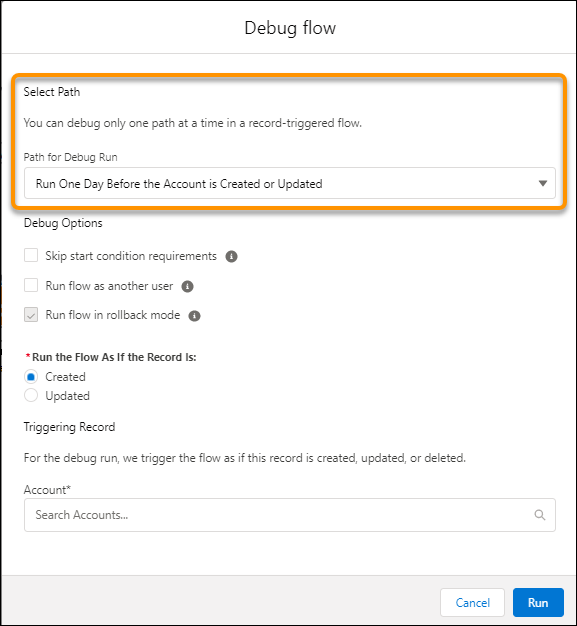
Salesforce has added a new section “Select Path” on Debug Flow page for Record-Triggered Flows. You can now select a path to debug whether it is a scheduled path, immediate path, or an asynchronous path. The paths that you have created in the Flow appear in the list. Choose one path at a time and debug the Record-Triggered Flow. E.g., Service Contract flow can have more than one path, an immediate one when it is created or updated and a scheduled-path when it is about to expire. So, now you can debug each use case individually.
Reference URL – https://help.salesforce.com/s/articleView?id=release-notes.rn_automate_flow_debug_scheduled_paths.htm&type=5&release=234
12. Choose More Options When You Debug a Flow
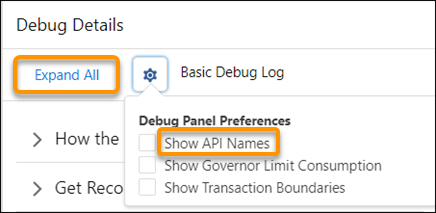
The Flow Debug Details page has a new look. Now when you debug a Flow, you can see element labels in Flow Builder and also in flow error emails. You have the option to set debug panel preferences such as Show API Names, Show Governor Limit Consumption or Show Transaction Boundaries. Debug Details panel is in an accordion style now with all the sections collapsed by default except for the ones where error occurred. So, you can focus on the element that caused the Flow to fail. Furthermore, when you click Debug in a Flow, it does not open a separate browser tab so one less tab to work with.
Reference URL – https://help.salesforce.com/s/articleView?id=release-notes.rn_automate_flow_debug_more_options.htm&type=5&release=234
Flow Management
13. View All Triggering Objects and Platform Events for Triggered Flows
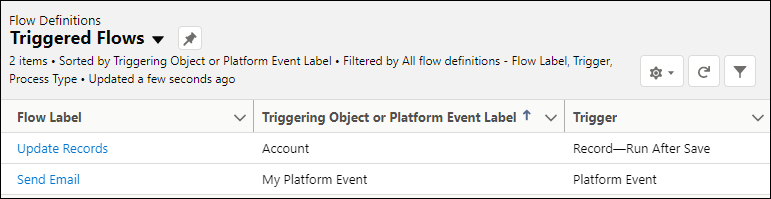
There’s a new Flow list view in town. Doesn’t sound familiar to ears, isn’t it? But it’s true. The all-new, editable, Triggered Flows list view shows you the object or platform event that triggers each flow just how you are used to see it on a Process Builder. Earlier you had to open the latest version of the Flow and see which object is triggering the Flow and when. Most of us even followed a certain naming convention to identify the Flows such “Account Flow – After a record is created or edited”. This is extremely helpful to take a quick glance at the Flows in the org. E.g. An Admin can take a sneak-peak on Flows detail page before inserting Accounts in system to analyze whether that will trigger any Flows.
Reference URL – https://help.salesforce.com/s/articleView?id=release-notes.rn_automate_flow_mgmt_triggered_flows_list_view.htm&type=5&release=234
14. Send Email Notifications for Every Automated Field Update
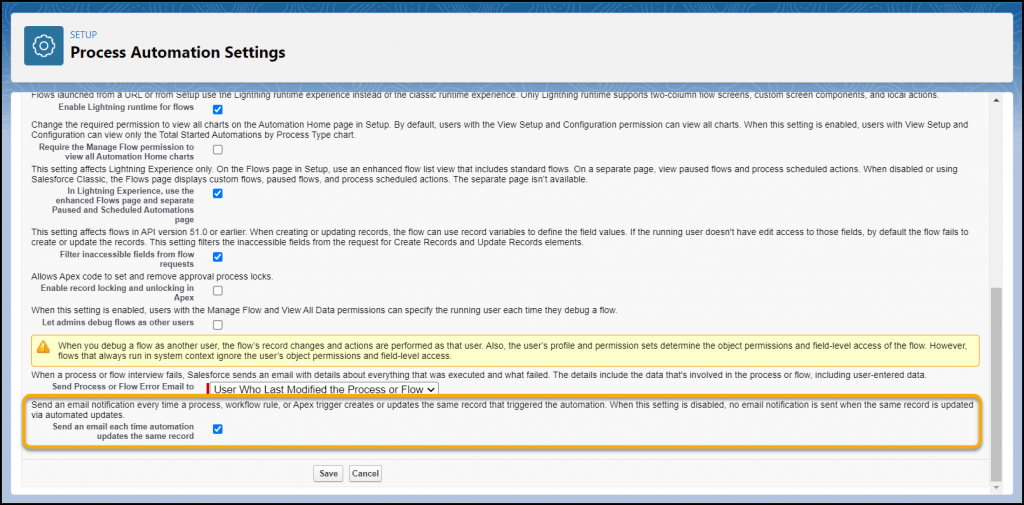
Process Automation Settings page in setup has a new setting “Send an email each time automation updates the same record”. Enable this setting if you wish to send an email notification each time a workflow rule, process, or Apex trigger updates the same record that triggered the automation. This previously released update required you to contact Salesforce Customer Support to stop suppressing email notifications. But now you can just turn it on like checking off a task off your list. Examples of use cases for this can be send a welcome email when a user is created, notify Case owner if they have been assigned a create an assignment rule and choose to notify users when they’ve been assigned a case.
Reference URL – https://help.salesforce.com/s/articleView?id=release-notes.rn_automate_flow_mgmt_email_notifications.htm&type=5&release=234
15. Run Optimizer to Get Recommendations for Migrating Your Workflow Rules to Flows
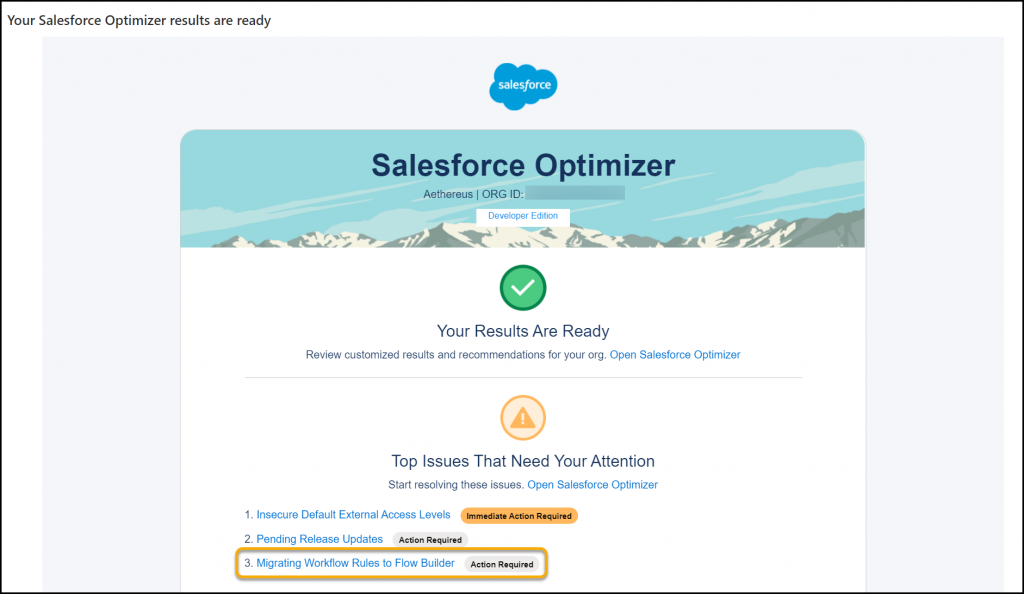
Salesforce Optimizer, the handy-dandy org analysis tool has a new update. Now it recommends you to move from using Workflow Rules to using Lightning Flow a.k.a Salesforce Flow. It shows “Action Required” if you have any Workflows that can be converted to Flow, or have any inactive Workflow Rules that need deletion. Salesforce Optimizer has updated the functions such as Migrating Workflow Rules to Flow Builder, Active Workflow Rule Limits, and Inactive Workflow Rules. So run the optimizer today and analyze the number of Workflows that need migration. The sooner your organization migrates to Flows the better because the Workflow Rules are not going to be upgraded in future and all the focus going forward will be on Flows. So, don’t be late to the party!
Reference URL – https://help.salesforce.com/s/articleView?id=release-notes.rn_automate_flow_mgmt_optimizer.htm&type=5&release=234
These were the most promising Flow updates from Winter ‘22 release. We are extremely excited to try our hands-on and start using them in real-life scenarios and can’t wait for them to be generally available.