Salesforce Spring ‘22 release is about to knock on the door. After having published the blog on general Salesforce updates, now is the time to get yourselves acquainted with top ten Flow features from this release in this exclusive blog. This release boasts almost 20 Flow updates that makes this point-and-click automation tool mightier than ever. Out of them all, we have come up with our top ten Flow features that stand out in this release. They are categorized in different sections namely Flow Builder, Flow Runtime and Flow Management. So, without further delay, let’s get to know the goodness Flow is bringing this release.
Flow Builder
1. Visualize All Your Record-Triggered Flows in One Place with Flow Trigger Explorer

Flow Trigger Explorer is a brand-new tool within the Salesforce Flow feature which shows you all your Record-Triggered Flows in one place and on a single page. It beautifully depicts the Flow list view in a more visual and interactive manner. It allows you to see all of the flows that are associated with a specified object e.g., Account, Contact, Opportunity or a Case. All the Flows that run when a record is created, updated, or deleted or shown in this view. It is more beneficial if you quickly want to glance on the number of Flows that are triggered to run for a specific criterion. For example, quickly see all flows that are triggered to run when a Case record is created.
Reference URL – https://help.salesforce.com/s/articleView?id=release-notes.rn_automate_flow_builder_flow_trigger_explorer.htm&type=5&release=236
2. Translate and Customize Button Labels in the Flow Screen Footer (Generally Available)

Now you can translate and customize button labels in the Flow screen footer. This update was in BETA last release and now it is generally available. Using this feature, you can modify the Previous, Pause, Next, and Finish button label text in Flow screens. Furthermore, you can also provide button label text for other languages so that it will be helpful for users in multi-lingual org. Customized screen navigation and meaningful button labels help end users to know what is going to happen next or what’s on the next screen. For example, if the last screen in your screen Flow is creating a Case record then you can have “Create Case” as button label on the last screen so the user knows this is the final step in the process.
Reference URL – https://help.salesforce.com/s/articleView?id=release-notes.rn_automate_flow_builder_custom_footer_labels.htm&type=5&release=236
3. Generate Choice Options from Record Collections

Now you can generate choice options in a Screen Flow from Record Collection variable. It allows you to use your existing record collections to generate collection-based choices in a Flow. By doing that, it prevents to duplicate the results of a Get Records element, a component, or an action, thereby saving you time. Rather than querying records again and again in Flow, it is recommended to create a collection once, and then use that collection anywhere that you need it. Once you have created a record collection choice set, you can add it to a choice component in your Screen Flow.
Reference URL – https://help.salesforce.com/s/articleView?id=release-notes.rn_automate_flow_builder_record_collections.htm&type=5&release=236
4. Filter Items into a Collection in Flow Builder
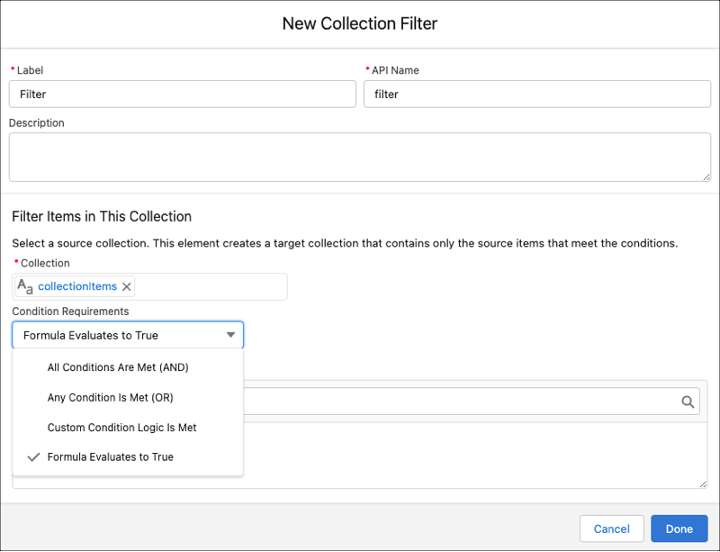
There is a new Flow element in town! It is the Collection Filter. Yes, that is true! Now you can filter items into a collection in Flow Builder to remove unwanted data from your collections. First, you create the collection and then use the Collection Filter element to define the conditions to restrict the number of records. When the Flow runs, the element outputs a collection with only the items that meet those conditions. This way, your original record collection remains intact. That’s cool! When defining conditions, you can set the requirements using a formula or logic, such as All Conditions Are Met, Any Condition Is Met, or your own custom condition logic.
Reference URL – https://help.salesforce.com/s/articleView?id=release-notes.rn_automate_flow_builder_filter_collection.htm&type=5&release=236
5. Define the Run Order of Record-Triggered Flows for an Object
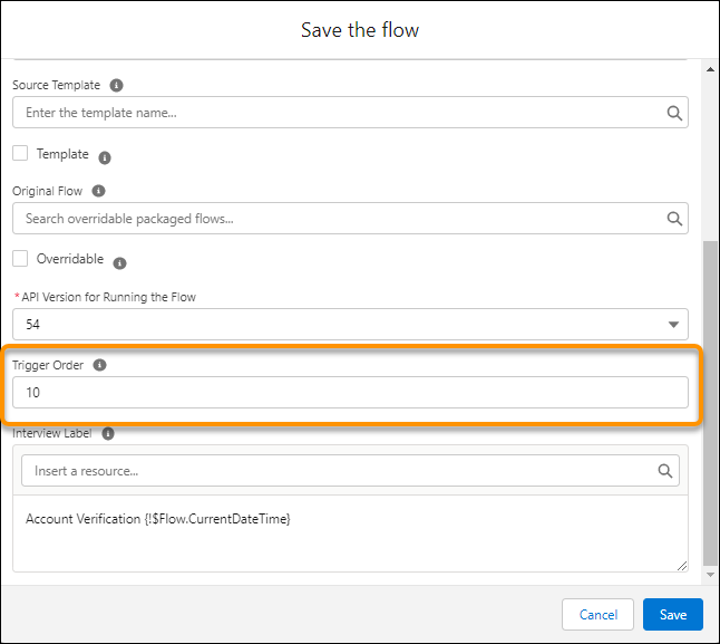
Remember the good ol’ days when we used to define the order in which the Workflow Rules to fire so that the automations can run in a systematic manner. The same principle is now applied to the Flow. Now you define the Run Order of Record-Triggered Flows for an Object. This is applicable only for before-save or after-save flows for the same object. It allows you to declaratively configure a Flow to run before or after another Flow. Now you can align your Flows in a meaningful manner to execute one after the other and prevent creating overly complex Flows. For example, you can prioritize an after-save Flow to run before other after-save Flows on the Case object. But you can’t prioritize an after-save flow to run before any before-save flows or before an Apex trigger. Multiple flows can have the same trigger order value.
Reference URL – https://help.salesforce.com/s/articleView?id=release-notes.rn_automate_flow_builder_trigger_order.htm&type=5&release=236
6. Open Sub-Flows from the Auto-Layout Canvas
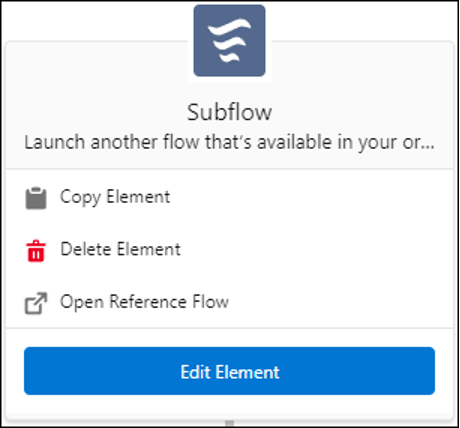
Salesforce Flow Auto Layout canvas has enhanced further more in this release. Now you can take a look at or tweak a sub-flow when you are in an Auto Layout mode. Yes, now it is possible to quickly access sub-flows right from the canvas. To open that referenced Flow right from the current Flow, click the sub-flow element and then click “Open Reference Flow”. There is also a possibility to open a referenced Flow while editing a sub-flow element.
Reference URL – https://help.salesforce.com/s/articleView?id=release-notes.rn_automate_flow_builder_open_subflows.htm&type=5&release=236
7. Connect Elements in For-Each Loops to Elements Outside of the Loop

This is yet another enhancement in Flow Auto-Layout in this release. Now you can connect elements in For-Each loop to the elements that are outside the loop. Use Go To connector a.k.a “Connect to Element” button in For-Each loop that to connect to an element outside of the loop. Now you can use these connectors to connect Flow elements across the Flow, except for End elements. For elements that are not adjacent to each other in the Auto-Layout mode, click Add element icon on the connector that needs to be changed. Once done, then click Connect to element. Next, click Select element icon on the element you want to connect.
Reference URL – https://help.salesforce.com/s/articleView?id=release-notes.rn_automate_flow_builder_connect_loop.htm&type=5&release=236
8. Easily Add Frequently Used Elements to Record-Triggered Flows via Shortcuts
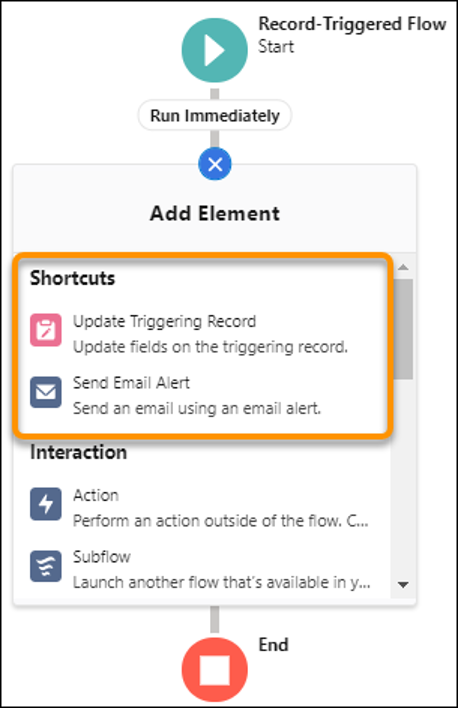
Salesforce Record-Triggered Flow now has “Shortcuts”. Yes, you heard it right! Shortcut is a new section you see after clicking on “+” sign when you are adding an element in the Record-Triggered Flow. It shows your most frequently used elements so that you can add them easily. This will reduce the scrolling that you need to do to select an element while creating the Flow. Kindly note that the Shortcuts are available only for Record-Triggered Flows in Auto-Layout mode.
Reference URL – https://help.salesforce.com/s/articleView?id=release-notes.rn_automate_flow_builder_shortcuts.htm&type=5&release=236
Flow Runtime
9. Checkbox Group and Dependent Picklist Components are rebuilt using LWC
Lightning Web Components (LWC) has been game changer since last two years and you can see its presence everywhere in Salesforce. Now it comes to Flow and the “Dependent Picklists” and “Checkbox Group” components are rebuilt using Lightning Web Components (LWC). Salesforce also improved the run-time error behavior for custom Aura components. For each Checkbox Group component, the info bubble is now larger and appears at the end of the component label. Earlier, the info bubble appeared in a subsequent line when a label used to be wrapped over multiple lines. Furthermore, now when a user clicks the info bubble, the help text appears in a popover rather than in a new window.
Reference URL – https://help.salesforce.com/s/articleView?id=release-notes.rn_automate_flow_runtime_screen_cmp.htm&type=5&release=236
Flow Management
10. Convert Workflow Rules to Flows with the Migrate to Flow Tool (Beta)
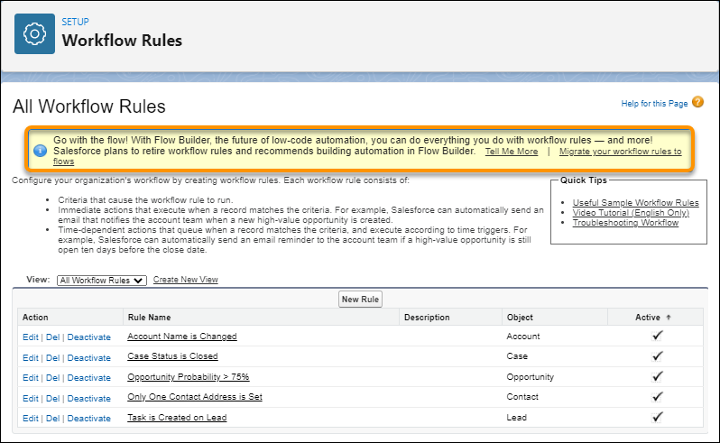
Workflow Rules had their days of glory and now it is time to move on from them and adapt to the Salesforce Flow, the future of low-code automation. But, how do you translate the logic in your Workflow Rules built over the years into the Flow. Yes, it’s a lot to process and too much to take, but Salesforce has your back. Use the all-new and shiny “Migrate to Flow” tool to convert your existing Workflow Rules into Flows. Using this tool, you can migrate Workflow Rules that contain: Field-Based Criteria, Field Updates, Email Alerts, Outbound Messages, and Time-Dependent Workflow Actions. If you are still using Workflow Rules, you will come across gentle reminders prompting you to consider creating Flows in Flow Builder rather than using Workflow Rules. Now is the time to move on because change is the only thing that is constant!
Reference URL – https://help.salesforce.com/s/articleView?id=release-notes.rn_automate_flow_mgmt_migrate_to_flow_tool.htm&type=5&release=236
These were the top ten Flow updates from Spring ‘22 release. We are really super excited and looking forward for this release to be generally available in all orgs and try our hands on these latest greatest features and start using them in real-life scenarios.